
Salads
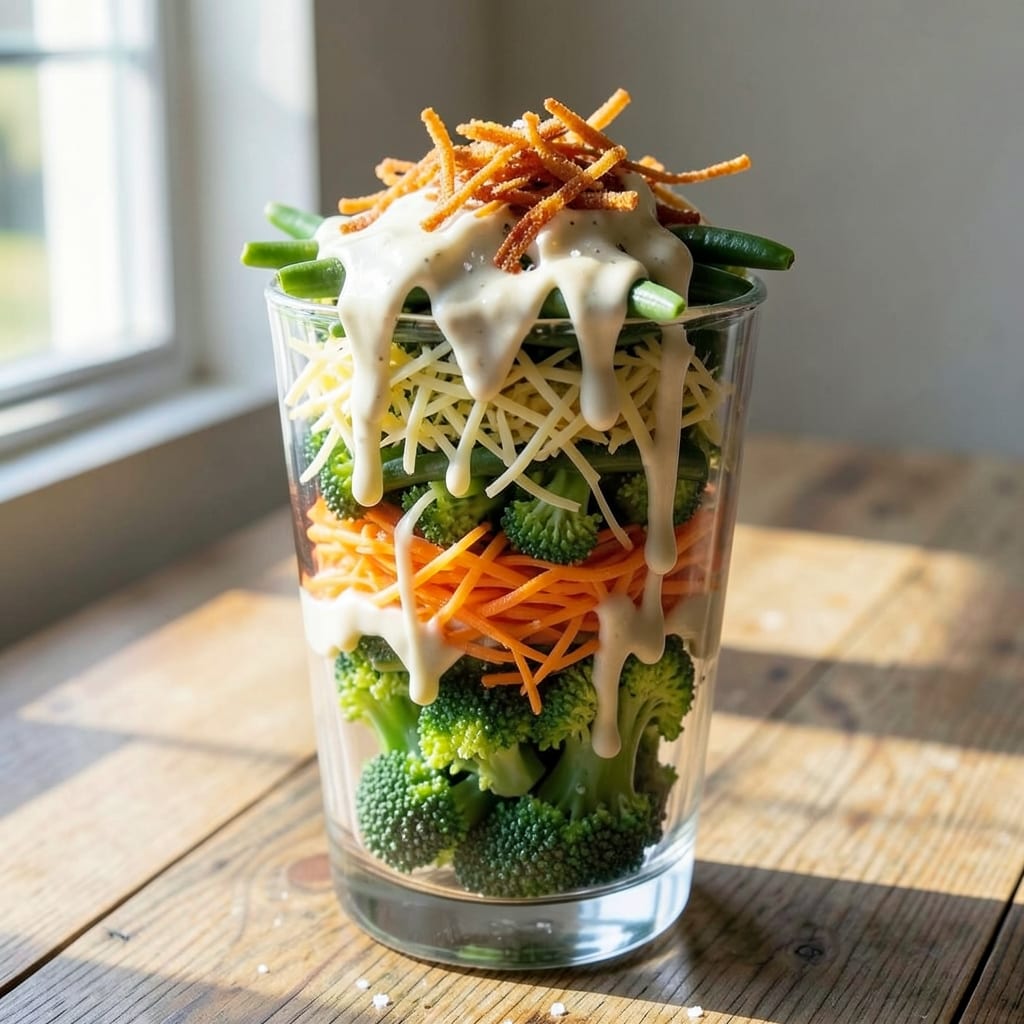
This 7-layer salad with broccoli transforms a simple side into a showstopping centerpiece—crunchy, colorful, and packed with texture in every bite. 💛 I first made this during a busy holiday season when I needed a dish that impressed without hours of prep, and it's been my go-to ever since. The secret lies in layering ingredients strategically so each component stays distinct yet harmonious, creating a salad that's as beautiful as it is satisfying.
The beauty of this recipe is its balance—creamy ranch dressing binds the layers without overwhelming the fresh vegetables, while the broccoli adds a satisfying crunch that holds up perfectly. I use a mix of shredded carrots, green beans, and cheddar cheese for texture contrast, and the crispy fried onions on top add a final crunch that makes it irresistible. What makes this salad truly special is how it comes together in just 15 minutes, yet tastes like it took all day to prepare.
By the time you're done assembling, you'll have a salad that's vibrant, hearty, and perfect for potlucks, picnics, or a weeknight dinner that feels like a celebration. The layers stay intact when sliced, making it easy to serve—just arrange it in a clear glass bowl and let the colors wow your guests. This isn't just a salad; it's a crowd-pleaser that delivers on both flavor and presentation.
For extra protein, add canned chicken or tuna between layers, or keep it vegetarian with extra beans and cheese. The possibilities are endless, but the foundation remains the same: a perfect balance of textures and flavors that make every bite satisfying. Let's build this salad!
Ingredients for 7 layer salad recipe with broccoli
Crunchy, colorful layers that stack high and impress every time—just these 12 ingredients transform a simple salad into a showstopper.
| Ingredient | Amount | Notes |
|---|---|---|
| Fresh Broccoli Crowns 🥦 | 1 ½ lb | Cut into small florets, steamed 3 minutes |
| Shredded Carrots 🥕 | 2 cups | Freshly grated, fine texture |
| Green Beans 🌱 | 1 lb | Trimmed, blanched 2 minutes |
| Shredded Cheddar Cheese 🧀 | 2 cups | Medium sharp, freshly grated |
| Crispy Fried Onions 🧅 | 1 cup | Red or yellow, store-bought or homemade |
| Ranch Dressing 🥛 | 1 ½ cups | Store-bought or homemade, full-fat preferred |
| Rice Krispies Cereal 🍞 | 1 cup | Original flavor, lightly crushed |
| Mayonnaise 🥫 | ½ cup | For binding layers, full-fat preferred |
| Salt 🧂 | ½ tsp | Adjust to taste |
| Black Pepper 🌶️ | ¼ tsp | Freshly ground |
| Garlic Powder 🧄 | ½ tsp | For extra flavor |
| Dried Parsley 🌿 | 1 tbsp | For garnish, finely chopped |
The broccoli is your secret weapon—fresh florets hold their crunch best, but frozen works in a pinch if thawed and drained well. Trader Joe's has the best pre-cut crowns, but regular florets work too. For the green beans, harvest-style (thicker) varieties stay crispier when cooked. The carrots? Freshly grated is key—pre-shredded gets soggy. If you're prepping ahead, store the veggies separately in the fridge until ready to assemble. The cheddar cheese should be medium sharp, not mild—it adds that perfect tangy bite that ties everything together.
No crispy fried onions? Toasted pecans or walnuts give a similar crunch (just toast 5 minutes in a dry pan). The ranch dressing can be store-bought (Hidden Valley is my go-to), but homemade with Greek yogurt and buttermilk is next-level. Short on time? Swap the green beans for blanched cauliflower florets—same texture, different flavor. The Rice Krispies add that signature crunch, but crushed potato chips or cornflakes work too if you're out. For extra protein, fold in canned chicken or chickpeas between layers—just drain them well to avoid sogginess.
This salad keeps beautifully for 3-4 days in the fridge if stored in layers with parchment between each. The glass bowl is non-negotiable for presentation—it lets the colors shine. To serve, slice into wedges and arrange on a platter. The layers stay intact for about 2 hours at room temperature, but trust me, it won't last that long. For potlucks, I always make a double batch—it disappears fast. The dressing gets absorbed over time, so if it's too wet after sitting, just add a little more mayo to the next layer.
Why You'll Love This Recipe
- No Chopping Chaos: I swear by the pre-shredded carrots and green beans here—no knife skills required. Just layer, press down, and you’re done. Even my toddler could assemble this (though I’d supervise the cheese).
- Crunchy-Creamy Magic: That crispy fried onion top? It’s the star. The broccoli stays bright, the cheddar melts just enough, and the green beans add a satisfying bite—like a party in your mouth where everyone’s invited.
- Potluck Hero: Bring this to a gathering and watch it disappear. It’s hearty enough for a main dish but light enough for a side. (Pro tip: Double the recipe—trust me, you’ll want seconds.)
- Fridge Friend: This salad tastes better the next day—yes, really. The flavors meld, the broccoli doesn’t get soggy, and it’s my go-to for lazy lunches. Plus, it’s cheap enough to make twice. Win-win.
Step-by-step instructions for building your 7-Layer salad
Layer by layer, we'll create that iconic crunchy tower—just like grandma used to make.
👨🍳 Step 1: Prepare All Vegetable Layers First
Start by blanching the 1 lb green beans in boiling water for 2 minutes, then immediately plunge them into ice water to stop cooking. Drain well and let them cool completely. This preserves their bright green color and crisp texture.
Next, steam the 1.5 lb fresh broccoli crowns (cut into small florets) for exactly 3 minutes until bright green and tender-crisp. Drain and let cool. The key here is to keep all veggies at room temperature before assembly—they'll hold their shape better in the fridge.
🥘 Step 2: Mix the Creamy Binding Layer
In a medium bowl, combine the 0.5 cup mayonnaise, 0.5 tsp salt, 0.25 tsp black pepper, and 0.5 tsp garlic powder. Whisk until smooth and creamy. This mixture will act as our glue between layers, keeping everything cohesive when sliced.
Here's the thing—don't skip the garlic powder. It adds subtle depth that makes this salad taste homemade, not store-bought. I like to mix it in now so the flavor distributes evenly throughout all the layers.
🍳 Step 3: Assemble the Layers in Your Pan
In a large 9x13-inch glass baking dish, spread ½ cup ranch dressing on the bottom to prevent sticking. First layer: spread the 2 cups shredded carrots evenly across the bottom. Press down gently to create a solid base.
Next comes the 1.5 lb cooled broccoli florets, followed by the 1 lb blanched green beans. Then sprinkle 1 cup shredded cheddar cheese evenly over the veggies. This layer order is crucial—it prevents the cheese from sinking to the bottom.
🥘 Step 4: Add Crunchy Layers and Final Touches
Spread the creamy mayonnaise mixture evenly over the cheese layer. Then add the remaining 1 cup crispy fried onions and the 1 cup lightly crushed Rice Krispies cereal. These final layers give the salad its signature crunch and texture contrast.
Drizzle the remaining 1 cup ranch dressing over the top and gently press down with a spatula to help everything adhere. The dressing will help bind the layers while keeping the salad moist. Sprinkle with the 1 tbsp dried parsley for a pop of color.
⏰ Step 5: Chill and Slice for Perfect Servings
Cover the dish tightly with plastic wrap and refrigerate for at least 4 hours, preferably overnight. This chilling time is non-negotiable—it allows all the flavors to meld and the layers to set properly for clean slices.
When ready to serve, remove from the fridge and let sit at room temperature for 10 minutes before slicing. Use a long, sharp knife to cut into 8 equal squares (about 2-inch pieces). The salad should hold its shape beautifully, with each bite delivering a perfect mix of creamy, crunchy, and cheesy textures.
Pro Tips For Making 7 Layer Salad Recipe With Broccoli
- Blanch Broccoli First: Drop those broccoli crowns into boiling water for exactly 30 seconds—no more, no less—then hit with ice water. This keeps them bright green and crisp, so they don’t turn into sad, mushy sludge by layer three. I learned this the hard way after serving a salad where the broccoli looked like it had been steamed for 20 minutes. ---
- Shred Carrots Fine: Use a box grater or food processor for shredded carrots, not a knife—unless you enjoy chunks that look like they belong in a stew. The finer the shred, the better it blends with the other layers without making the salad look like a veggie dumpster fire. (Yes, I’ve seen it happen.) ---
- Layer Cheese Last: Add the shredded cheddar right before serving, not when you’re prepping. It melts into the dressing faster than you’d think, turning your crispy layers into a sad, gloppy mess. If you’re making this ahead, keep the cheese separate until the last minute—trust me, your guests will notice. ---
- Crunch Onions Early: Fry those crispy onions before assembling the salad, not as an afterthought. They’ll lose their crunch fast once mixed in, and nobody wants a salad that tastes like soggy onion flakes. Store them in a sealed container until you’re ready to layer—this is the thing that makes the whole dish sing.
Best sauces and condiments for 7 layer salad recipe with broccoli
Creamy Ranch Base
I always start with a homemade ranch for that authentic flavor—mix 1 cup mayonnaise, ½ cup sour cream, ¼ cup buttermilk, 1 tbsp fresh dill, 1 tsp garlic powder, and ½ tsp onion powder. The buttermilk adds tang that store-bought ranch often lacks. For extra richness, fold in 2 tbsp Greek yogurt—it keeps the dressing thick enough to bind layers beautifully. 🥛
Cheesy Variations
Swap shredded cheddar for Monterey Jack if you prefer a milder, creamier bite. For a tangy kick, mix in ½ cup crumbled blue cheese with the ranch—it pairs surprisingly well with the sweet carrots. I once added ½ cup feta for a Mediterranean twist, but stick to cheddar for the classic version. Always grate your own cheese—pre-shredded has anti-caking agents that make the layers gummy.
Crunchy Add-Ins
Need a nutty crunch? Replace Rice Krispies with ½ cup toasted pecans or walnuts—just toast them in a dry pan for 3-4 minutes until golden. For a savory twist, add ¼ cup crispy bacon bits between the cheese and fried onion layers. I also love ½ cup crushed potato chips (like Ruffles) for a retro vibe—just make sure they're completely dry to avoid sogginess.
Dressing Upgrades
For a spicy kick, stir 1 tsp hot sauce or ½ tsp cayenne into the ranch. A herb boost comes from adding 1 tbsp chopped fresh chives or dill right before serving. For a smoky flavor, mix in ½ tsp smoked paprika with the garlic powder. These tweaks turn a classic salad into something uniquely yours without sacrificing the signature layers.
Protein Layer Options
Add 1 lb cooked chicken breast (diced) or 1 can (15 oz) tuna (drained) between the green beans and cheese layers for extra protein. For vegetarian versions, mix in 1 can (15 oz) chickpeas (rinsed well) or ½ cup hummus as a creamy alternative. Just be sure to drain all canned proteins thoroughly—excess liquid ruins the crisp layers. 🍗
Sweet & Tangy Finish
Drizzle 2 tbsp honey or maple syrup over the top just before serving for a sweet contrast to the salty cheese. A squeeze of lemon juice brightens the flavors, especially if you're using a heavier dressing. For a fruity twist, add ½ cup diced apple or pears to the carrot layer—they hold up well and add natural sweetness. Trust me, this unexpected combo elevates the whole salad.
Nutrition facts
Frequently asked questions
Can I make this salad ahead of time?
This salad actually tastes better when made a day ahead. The flavors meld beautifully in the fridge, and the layers hold together perfectly. Just assemble it in your glass dish, cover tightly with plastic wrap, and refrigerate for at least 4 hours (overnight is ideal). Let it sit at room temperature for 10 minutes before slicing to make clean cuts.
What's the best way to keep the layers from getting soggy?
Proper prep is key! First, make sure all your veggies are completely cooled before assembling. Drain all water from cooked ingredients like green beans and broccoli. Use a full-fat mayo for the binding layer—it's thicker than light mayo and helps prevent moisture. Also, press each layer gently as you go to create a solid base. If your salad still seems wet after chilling, add a thin layer of crushed crackers between the cheese and fried onions.
Can I use frozen broccoli instead of fresh?
Yes, but with one important step! Use fresh or thawed frozen broccoli florets that have been drained completely. Steam them for 4 minutes instead of 3 to ensure they're fully cooked through. The texture will be slightly softer than fresh, but it still adds great flavor and color. Just be sure to press the layer firmly when assembling to maintain structure.
How do I make this salad without Ranch dressing?
Easy! Mix together ½ cup mayonnaise, ¼ cup sour cream, 1 tbsp lemon juice, 1 tsp garlic powder, ½ tsp onion powder, ½ tsp dried dill, and salt/pepper to taste. This homemade version gives you more control over the thickness and flavor. For extra tang, add 1 tsp buttermilk to the mix. Use it just like you would store-bought ranch in the recipe.
What's the best way to serve and slice this salad?
Use a 9x13-inch glass baking dish for perfect presentation—it lets the colors shine! Once chilled, let the salad sit at room temperature for 10 minutes before slicing. Use a long, sharp chef's knife to cut into 8 equal squares (about 2-inch pieces). For serving, arrange the squares on a platter with toothpicks if needed. Pro tip: Add a sprinkle of fresh parsley or a drizzle of extra ranch on the platter for garnish.